Map Panel: Main map display and feature interaction area
-
Zoom in using one of the following methods:
-
Double tap (1 finger)
-
Spread (2 fingers)
-
Double tap drag down (single finger, on the second tap you hold and drag towards the bottom of the screen)
-
-
Zoom out using one of the following methods:
-
Two finger tap (at the same time)
-
Pinch (2 fingers)
- Double tap drag up (single finger, on the second tap you hold and drag towards the top of the screen) - this is the only way to zoom out when using a passive stylus (e.g., with gloved hands)
-
- Pan
- Drag
- Auto-Pan
- Use auto-pan tool to continuously pan the map to the current GPS location

Main Toolbar
Select Map Cache (folding map icon): Allows the user to choose a map cache from the available loaded caches.
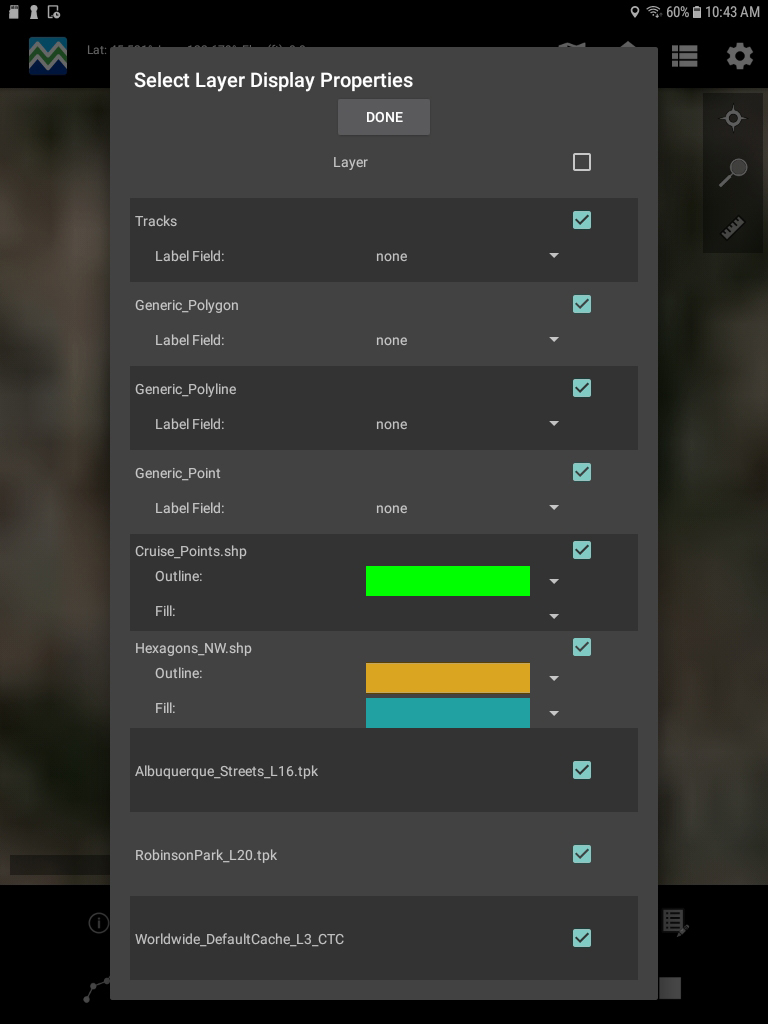
Select Display Layers (layers icon): Allows the user to choose the visible cache and feature layers from the loaded feature service, .tpk, .shp, and .mbtiles files.
- Operational layers are listed at the top, then Shapefiles, then TPKs (e.g., imagery, topo maps).
- Check or uncheck the box next to the layer to turn it on and off in the map display. To turn all layers on or off at one time, check/uncheck the top box.
- Note that in order to collect data into a feature layer, it must be visible in the map.
- Labels
- To display labels for a layer select the label field
- Note that displaying labels can impact performance, especially when there are a large number of features in the layer or Shapefile. Use with caution.
- Shapefile symbology can be adjusted
- The outline (point, line, polygon)
- Fill color (polygon only) can be changed by selecting desired color from drop down (default fill for polygon Shapefiles is clear)

Menu Button (table icon): See below for menu button functionality descriptions.
MobileMap Settings (gear icon): Allows users to change settings and license key. See the Settings page for more details on Settings.
ACTIONS MENU
The Actions Menu provices access to a large number of operations (or 'actions'). Some actions are used frequently (e.g., daily) whereas other items are not commonly used by most users. The most commonly used actions are listed at the top and have larger buttons to make it easier to quickly launch these actions.
Sign In to ArcGIS: Launches sign-in window for ArcGIS (Online or Portal for ArcGIS). Users must sign-in with username and password in order to access key functionality (see list below).

Users must sign in to ArcGIS Online (or their organization's Portal for ArcGIS) to perform the following actions:
- Discover (refresh) list of available feature services (inside the Select Feature Service tool)
- Retrieve driving directions (using the Get Directions link when querying a feature)
- Download basemaps (using the Download basemaps)
For more common daily workflows, including uploading and downloading data, MobileMap can use credentials that are stored in the MobileMap settings (Settings > Authentication Settings > ArcGIS Username and ArcGIS Password).
Upload*: Uploads new and edited features to the selected feature services from ArcGIS Online.
Download*: Downloads features from the selected feature services from ArcGIS Online.
* Prior to uploading, downloading, or collecting data, the database must be initialized with the desired Feature Service from ArcGIS Online. The steps for this are described below and include:
1. Sign In to ArcGIS
2. Select Feature Service(s)
3. Initialize Database
4. Edit Download Parameters (Optional)
Note that steps 2 and 3 are typically completed just once, at the beginning of a field data collection campaign. Step 1 must be repeated whenever uploading/downloading data for secured services. Step 4 is optional and is used only to customize the way data is accessed, typically to limit the amount of data downloaded to the device.

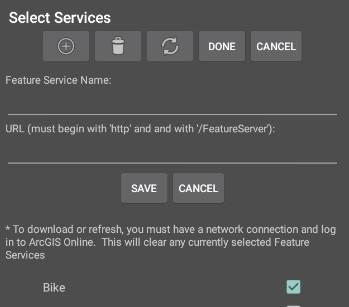
Select Feature Services: Launches window for ‘discovering’ Feature Services from ArcGIS Online. The Feature Service holds the templates and data for data collection. If a user is signed in to ArcGIS online, they can ‘discover’ feature services by tapping the download/refresh icon. Once populated, tap the checkbox next to the feature service to select it from the Feature Services list. Feature Services may also be entered manually by tapping the + button and supplying the name and URL to the service.
This is typically only used when a user is not signed in to ArcGIS Online and is using a public Feature Service.
Initialize Database: Creates local feature layers (templates) to be used for collecting feature data. Feature layer definitions are copied from feature service(s) in ArcGIS Online. WARNING: Initializing will delete ALL data on your device. If you have collected or edited any data on your device, make sure to upload your data before Initializing Database. Initializing the database is needed whenever the Feature Service is republished or updated. This can happen when an administrator makes a data model change (e.g., adds a feature class, renames an attribute field, changes a domain value, sets an attribute field to required) or when MobileMap settings that are stored in the Feature Service description are updated. MobileMap completes the following steps when reinitializing
- Deletes all data from the local database
- Queries and stores data model and symbology for all layers (data types for attribute fields, required fields, allowed values, etc.)
- Saves MobileMap settings which may have been stored in the Feature Service description
When initialization completes, you will see a list of the feature layers and feature tables that have been downloaded. If MobileMap settings have been stored in the Feature Service description, you will see a note stating: "Feature service description field contains MobileMap settings. These are now available for import using the 'Import Settings' tool with the 'From feature service' option." Importing these settings will ensure that you have the default settings that the administrator has created for this feature service(s).
- Region='NW'
- Cruiser_ID='JJD'
- Status='Planned'
- Acres>40
Edit Configurable Defaults: Allows user to set defaults for any field that is associated with a domain list (pick list).
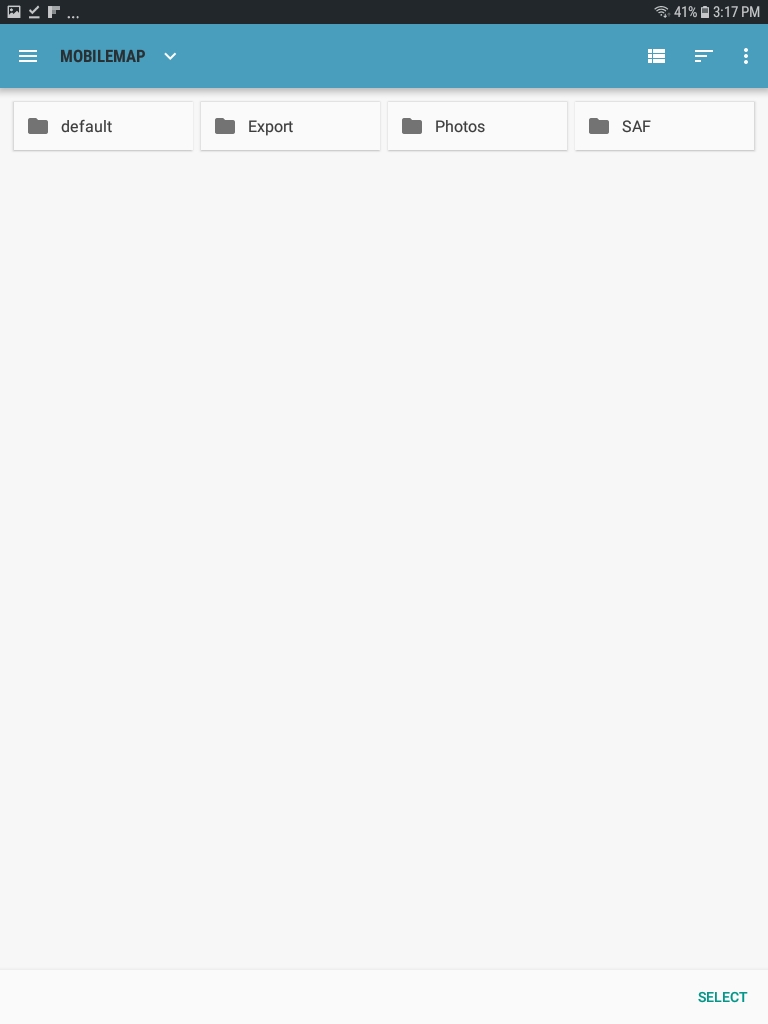
In order to enable write access to your file system, Android requires you to grant access to MobileMap for a specific data directory. When you first install MobileMap, you will be prompted to select the data directory. It may be necessary to repeat this process if you add additional MobileMap data directories or if you change your MicroSD card (see note below for more details on changing your MicroSD card). To do this, choose 'Select Data Directory' from the main menu, then select 'Change'. In the user interface that opens, you may need to select ‘Show SD card’ from the ‘more’ menu. Select the MicroSD card from the list on the left and navigate to the MobileMap directory. When you are in the correct directory, tap the link at the bottom which should read ‘SELECT' or something similar. Verify the path in the Select Data Directory popup and, if correct, select ‘Done’.


Changing your MicroSD card can cause data access issues on some devices. If you change your MicroSD card and MobileMap crashes on startup, you will need to re-insall the previous MicroSD card, then unselect this as your data directory, then load the new MicroSD card and select that as your data directory. The steps to complete this process are as follows:
- Re-install the previous MicroSD card and restart MobileMap
- Verify that MobileMap is working and that map data from the MicroSD card
- Change the data directory to any directory on your internal storage (Actions>Select Data Directory > Change, then select any internal directory - like 'Downloads', then select Done)
- Remove MicroSD card and replace with the new MicroSD card
- Change the data directory to desired directory on your MicroSD card (Actions>Select Data Directory > Change, then select the MobileMap directory, then select Done)
Download Basemap: Typically, users are provided with map caches filled with relevant basemap data including imagery and other data. Sometimes, however, it is useful to download smaller basemaps prior to fieldwork. To download a basemap from Esri’s basemap services, sign in to ArcGIS (see above), then select 'Download Basemap' from the main menu. This will open a new interface for selecting the area of interest. Select the desired basemap, zoom and pan to the desired extent, then select the maximum zoom level to download. Larger numbers (e.g. L16) produce higher resolution data than smaller numbers (e.g., L8). This process can be slow and may result in large downloads. Begin with smaller zoom levels (e.g., L10) and smaller extents at first, and increase if needed, and if download time and file size allow. Tap 'Download' to begin the process. The downloaded file will be saved to the device's Download folder and a popup message will notify you when the download is complete. Close the popup window, then use the back button (upper left) to return to MobileMap. Use a file manager application to copy the downloaded TPK to the desired map cache in your data directory, then reload the desired map cache to see the downloaded basemap data. Filenames will include the basemap name and maximum zoom level (e.g., USA_Topo_Maps_L16.tpk.
Export Database: Exports the entire feature database to a local copy on your device storage. Export is only necessary if the user needs to create a local backup copy of collected data. This backup data is stored on the device and can be retrieved by an analyst in the office.
Features to JSON: Exports all data in a currently selected feature layer to a user-provided destination on the tablet in a file format called JSON. These data can be loaded in ArcMap using the JSON to Features tool in ArcMap. This export is not used in typical workflows and is only necessary if a user needs to transfer new or edited data to a desktop computer while an internet connection is not available.
Export Cruise Data: Exports timber cruise data as comma separated value (CSV) files for Stands, Plots, Trees and (optionally) logs. Requires a configuration file (cruiseExportMapping.csv) which maps between the Esri data model and the desired output CSV file format.
Export Settings: Exports a local copy of the current settings as a text file.
Import Settings: When using the ‘Import Settings’ tool, you can choose to import settings from the description field of the currently selected feature service, or from a settings text file saved on the tablet. Importing settings from the currently selected feature service works if and only if the feature service contains valid settings parameters in its ‘description’ field. To import settings from a feature service, select the ‘Import Settings’ tool, then select the 'From feature service ‘description’ field' option, and then press the ‘LOAD’ button. Uncheck any settings you do not wish to import.
There are scenarios where it may be necessary to reset all settings back to their default values. This happens automatically when a user uninstalls, then re-installs MobileMap. To reset settings without unintsall/re-install, you can use the Restore Defaults option in the Import Settings tool. This may be needed if you recently made several adjustments to settings, are experiencing errors during data collection, but can not seem to resolve the issues even after attempting to manually restore the previous settings. This may also be helpful when testing settings that have recently been added or updated on a feature service. To restore settings to their default values, select DEFAULTS in the Import Settings dialog, and confirm the warning message by selecting OK. Note that all settings will be restored to their default values. This means that even licensing information will be lost. It is advised that you copy the license device code to the device clipboard prior to restoring settings so that the device can be re-licensed immediately after restoring default settings.


